I mentioned in a previous post that a fair chunk of the time I’ve spent at the computer on this trip has been for processing our pictures. Why so much time, and why process at all? It’s not actually that much time compared to what we spend seeing things in the areas we visit each day, but it is the majority of the time I spend on the computer. There are a number of things I’m doing: importing, adding keywords, culling down to the pictures we want to post, making modifications to those images, and finally exporting them.

Import and Keywords
The import is very simple, due to the automation of the software I use, Adobe’s Lightroom 4. During the import, I will add keywords that apply to all of the images being imported. Afterwards, I will add additional keywords to subsets, or individual photos; for example, I add the keyword “Lana” to all the pictures she appears in, or I add the keyword “Glacier National Park” to all of the pictures taken in the park, etc. If I import pictures every night, it takes just a few minutes, and the keywording is easy, since the day is still fresh in our minds. This might seem a bit detail oriented, but it’s a very small price to pay for having a useable picture library, rather than an enormous, unlabeled grab bag. We will have more than 30,000 images by the time this trip is over. A relatively simple task like choosing a picture of Lana and me for a Christmas letter would be tedious to impossible if we had to rifle through that entire collection without any way to search by name. Instead, we’ll be able to filter the collection to display only images that contain both the keywords “Lana” and “David”, and instantly we can choose one we like from a (comparatively) small set of images. Or, we can quickly find all of the pictures we’ve taken with our travelling gnome, Mr. Bee.

Culling
Once the pictures from all three cameras are in Lightroom’s library, we will review each picture briefly, and give anything with promise a 1-star rating, and mark any obvious rejects (blurry, etc.) for deletion. This is also a fairly quick process. Like keywording, it’s easier to do the same day the pictures were taken. Sometimes we review them together, sometimes we each take our own pass. Usually at this point, I will stop working on images from today, and either Lana will start lining up the next accommodation reservation, or I will start catching up on an earlier day’s pictures. If that day has only 1-star images, I’ll filter the display to only show those, and go through the second pass of giving the best a 2-star rating. Very roughly speaking, 1 picture in 20 makes it this far. Here’s a 0-star self-portrait failure (the 2 second self-portrait timer was not long enough for me to get back to Lana) that didn’t make the cut, but is still amusing:

Processing
Only when we’ve culled the pictures down to the 2-stars will I invest time in making adjustments. If it’s called for, I will crop or rotate. The jpeg images from the small camera will generally be finished now, though some will need some tweaks for severe highlight clipping, or to brighten shadows to reveal details or facial features. The raw format images from the two larger cameras get a number of additional adjustments, but I generally spend less than a minute working on each one. The picture above is unprocessed, and the picture below is the same image, after cropping, rotating, and 7 simple adjustments.

Exporting
I have configured an export preset in Lightroom, which automates saving all of the finished, 2-star images to a folder, resizing each to make the longest edge 1000 pixels, for a more uniform appearance on the blog. This takes essentially no time. Now they’re ready for posting, once we write up a coherent description.
Why Raw?
Since it’s so much faster to process the jpeg images from the smallest camera, why don’t I do the same with the two larger cameras? There is no shortage of really well written information on the advantages and shortcomings of raw format on the web, and this won’t be a detailed recap of that, but I will describe why I choose to dedicate time to hunching over a computer, post-processing while I’m travelling in exciting places. For that to make sense, I need to briefly explain what the difference is between the two image formats.

Digital Capture
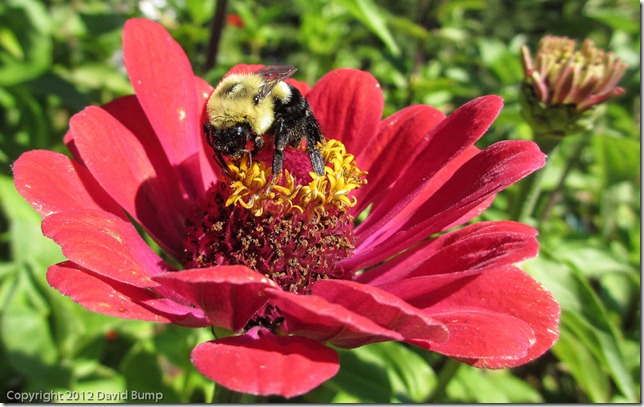
All digital cameras translate the light from an exposed sensor chip into raw sensor data—or a raw format image. Most cameras use a tiny, specialized computer chip to immediately convert the raw data into a standard format known as jpeg, which can be displayed on pretty much any digital device, including your web browser. Once that jpeg image is saved to the camera’s memory card, the original raw sensor data is permanently discarded. Some cameras allow you to save the raw sensor data to the memory card instead. This data is not an image, per se, and it cannot be displayed directly on a web page. You need a specific computer program to interpret that data, and display the image that it represents, and eventually, to save it in a format (often jpeg) that can be displayed by other devices. There is a lot more data in a raw ‘image’ than there is in a jpeg image; raw data records 4096 levels of brightness for each pixel (12-bit), where jpeg images can only record 256 levels of brightness (8-bit). While that’s a big difference, it’s made even more severe by the linear nature of sensors, which means that half of those brightness levels are dedicated to the brightest 6th (or so) of the image. So a jpeg can only represent the darker 5/6 of an image with 128 tonal variations, compared to 2048 in raw. This isn’t to say you can’t take great pictures in jpeg, by an means—when I choose not to lug around a larger camera, the small camera (in gentle lighting conditions) can produce jpegs I’m quite happy with, like this bumble bee:

Creative vs. Technical
This is where I won’t discuss why that additional data allows you to create technically better images. Others have beaten that horse much more thoroughly than I can. What I wanted to explain was that a raw image has a lot of data available for you to do something with, and also that you have to do something with it in a specialized program before anyone else can see it. For many people, this is enough of a drawback for them to skip shooting in raw. To me, it’s actually the compelling reason to shoot in raw. I get to the chance to be creative with that data, and choose exactly how my image will appear. Raw format is often compared to film negatives, and I think the analogy is good in many ways. For me, shooting in jpeg is the creative equivalent of sending my film in to a lab, and letting someone else make many of the important decisions about how the finished product will look. The only difference is that with a digital camera, a tiny on-board chip is calling the shots instead of a lab technician. Shooting in raw is like developing your own film—but without the expensive, noxious chemicals—you are in control of a wide range of adjustments that determine how you finished image will appear.
Coaxing what I saw out of a file is at least half of the creative fun and challenge as the composition and timing of the shot, along with controlling the comparatively simple aperture, shutter and ISO settings. I’m thoroughly in the Ansel Adams (who spent hours in the darkroom) camp of “You don’t take a photograph, you make it.”
Which is a long way of saying that I’m hunched over a computer in exotic locations because I enjoy it, not because I have to.

No comments:
Post a Comment